Streaming OpenAI in Elixir Phoenix Part III
- Date
This is the final part in a series about streaming OpenAI chat completions in Elixir.
- In part I, we implement a module and API endpoint for streaming chat completions.
- Part II revisits stream parsing and why you may want stateful parsing.
- Part III (this post) uses Phoenix LiveView to stream completions to users of your site.
Creating our LiveView
To keep this post reasonable in length, we’re going to focus solely on streaming chat completions to the client using LiveView. Storing chats in the database, authenticating users, etc. is out of scope.
Since we’re not storing data, we’re not going to use the Phoenix generators to create our LiveView. Instead, we’ll create these ourselves.
Let’s start by creating my_app_web/live/chats_live/index.ex:
defmodule MyAppWeb.ChatsLive.Index do
  use MyAppWeb, :live_view

  @impl true
  def mount(_params, _session, socket) do
    {:ok, socket}
  end
end
Next, create my_app_web/live/chats_live/index.html.heex and add the following:
<div class="h-full w-full max-w-3xl flex flex-col mx-auto bg-gray-50 drop-shadow text-gray-700">
  <ol class="grow flex flex-col-reverse overflow-y-auto">
    <li class="h-full hidden only:flex items-center justify-center">
      No messages. Enter a message below to begin.
    </li>
  </ol>
  <div class="shrink-0 w-full">
    <form class="border-t border-gray-200 p-4 space-y-2">
      <textarea
        class="block resize-none w-full border-gray-200 rounded bg-white focus:ring-0 focus:border-gray-300 focus:shadow-sm"
        placeholder="Enter a message..."
        rows={4}
      ></textarea>
      <div class="flex justify-end">
        <button class="bg-gray-200 hover:bg-gray-300 transition px-3 py-1.5 rounded flex items-center justify-center">
          Send
        </button>
      </div>
    </form>
  </div>
</div>
We’ll point /chats to our LiveView in the routes file:
 scope "/", MyAppWeb do
   pipe_through :browser

   get "/", PageController, :home
+  live "/chats", ChatsLive.Index, :index
 end
Lastly, let’s simplify our app layout with only the markup and styles needed.
Open my_app_web/components/layouts/app.html.heex and update it to:
<main class="h-screen bg-slate-800">
<%= @inner_content %>
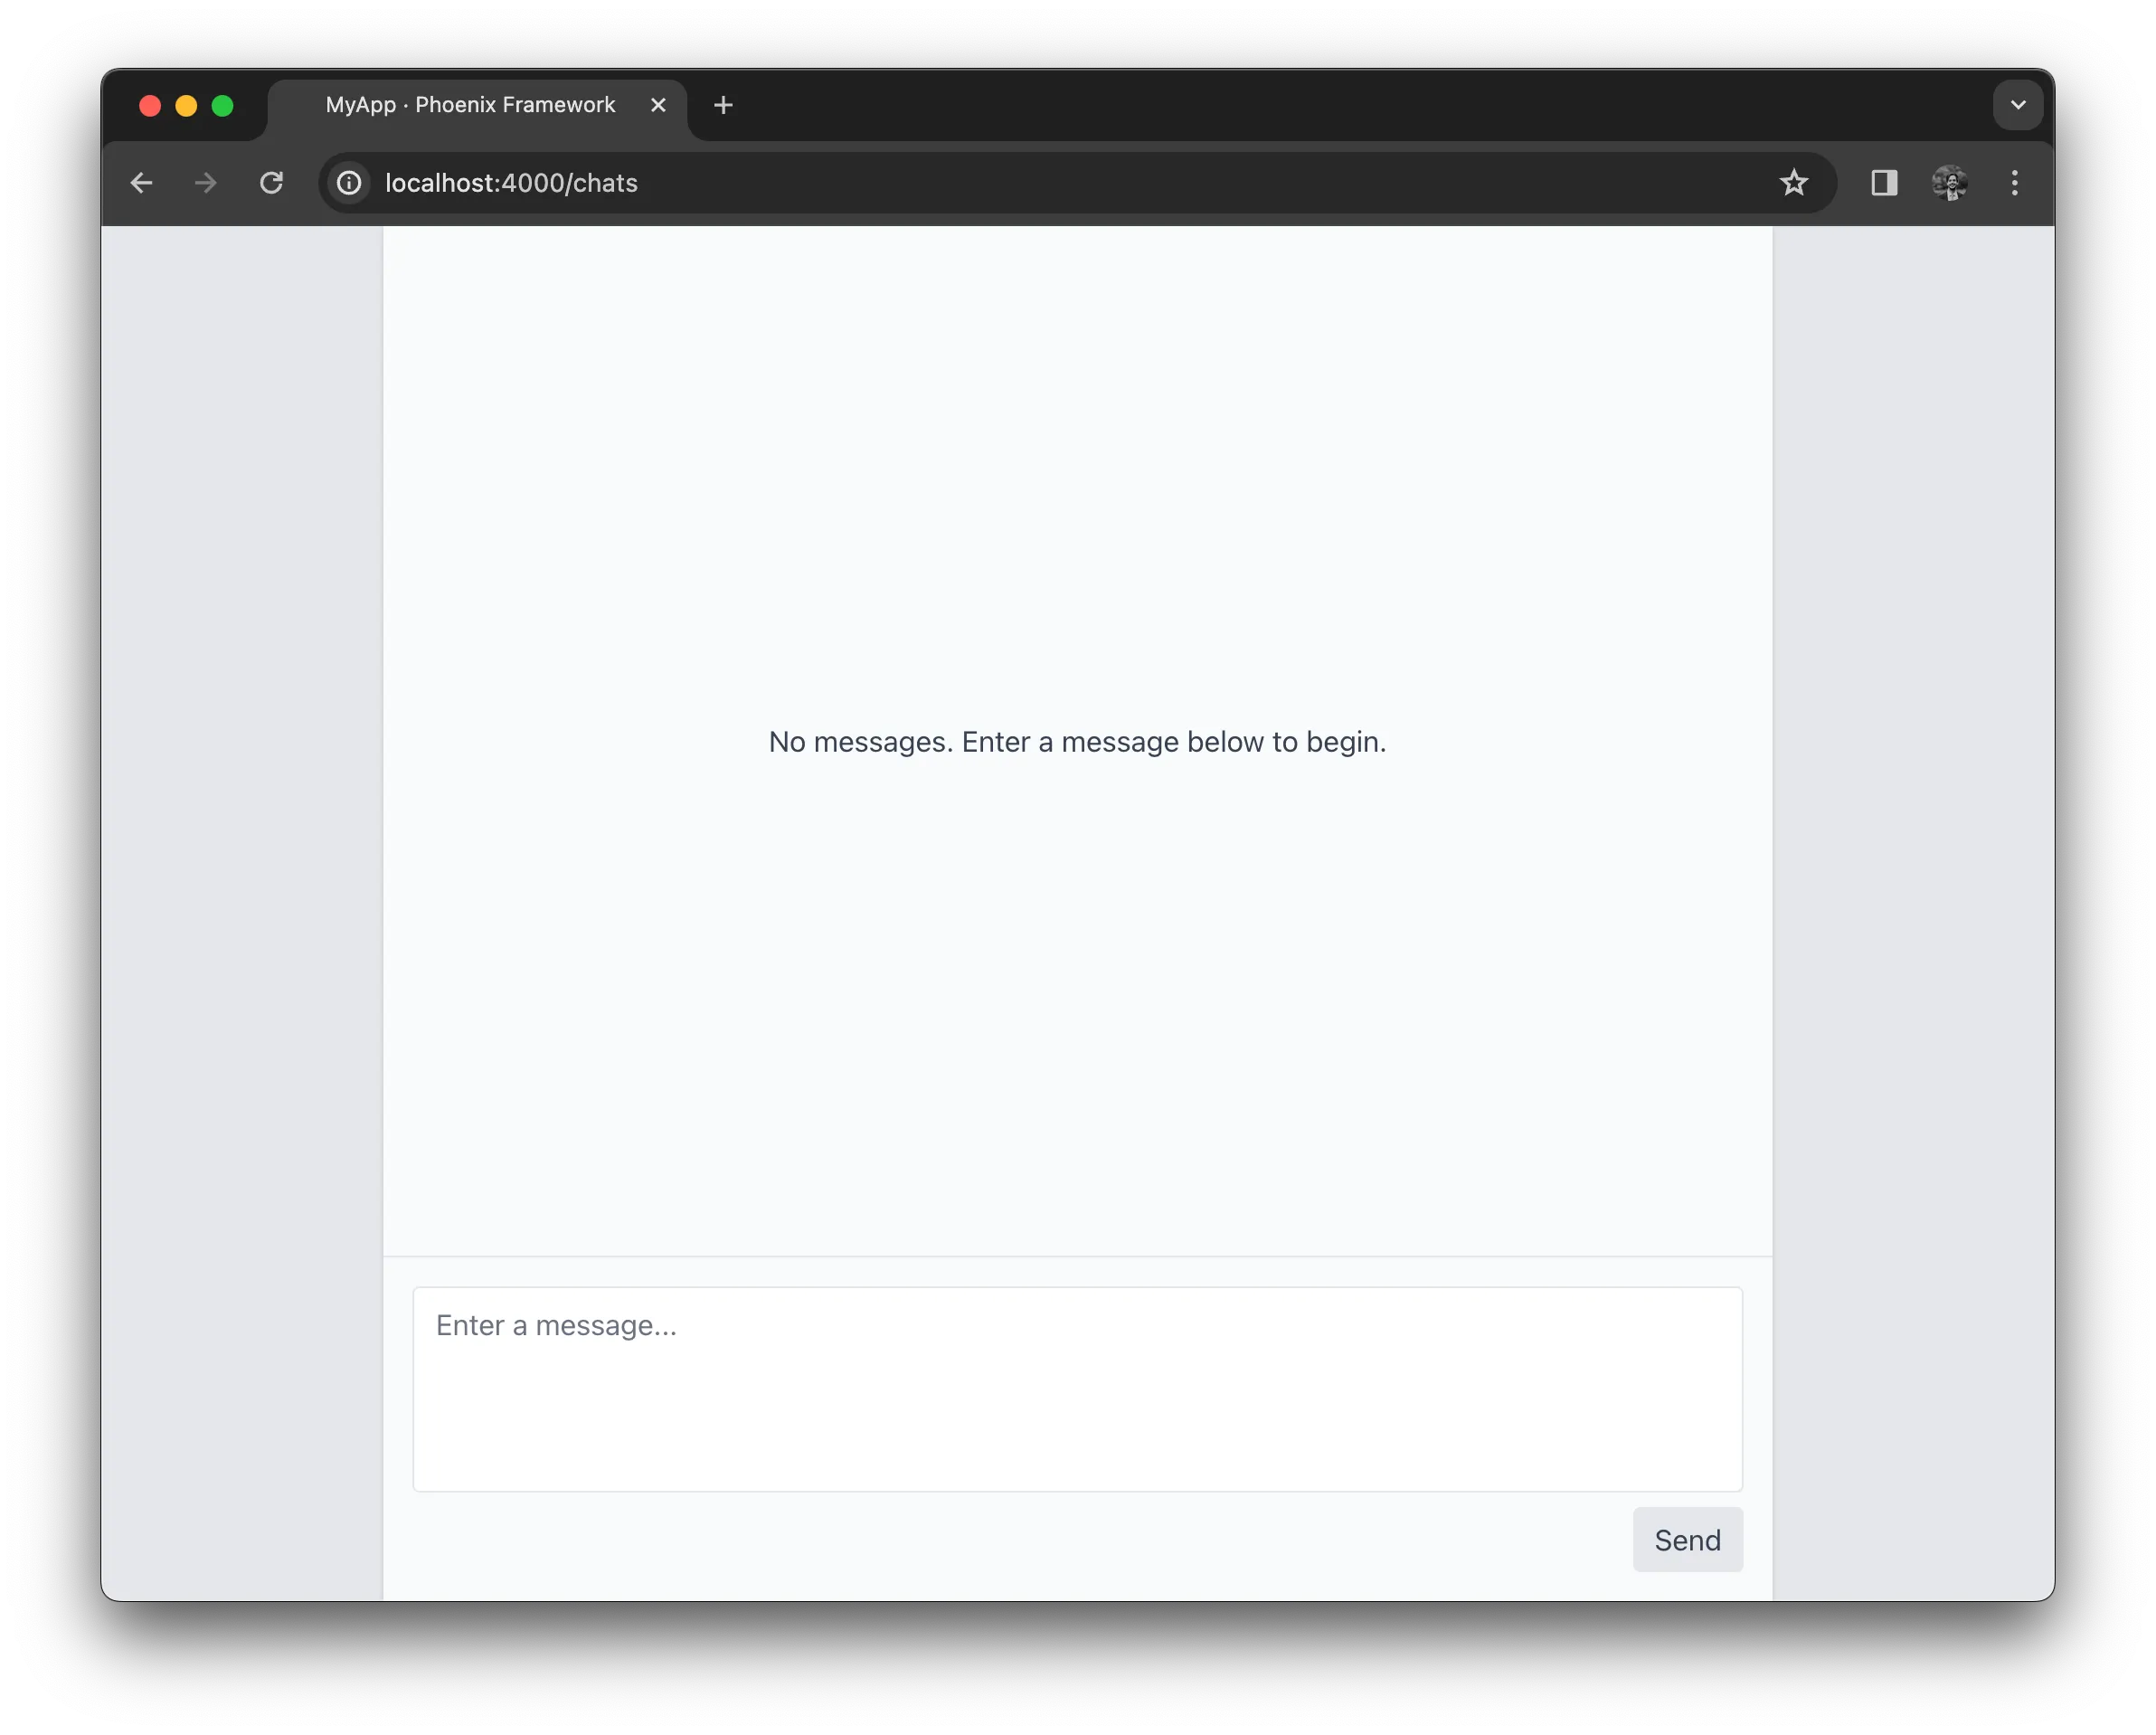
</main>At this point, if you navigate to /chats, you should see a UI that looks like this:
Submitting a message
In order to stream messages to our frontend, we first need to submit messages to the model for a reply. We’ll do that here.
In most Phoenix applications, Ecto would be used to model our data and persist it in a database. The convention is to convert our models
to Phoenix.HTML.Form objects and pass that to the form
component.
Since we’re not using a database in this tutorial and our needs are simple, we’re not going to use Phoenix’s form helpers. Instead, we’ll build the form with plain HTML and simply forward the message along to OpenAI upon form submission.
To begin, add a callback to handle form submit events on the server. This will be called when the user submits their message.
In my_app_web/live/chats_live/index.ex, add the below code. For now, it won’t do anything other than pattern match on an object
containing a content key.
@impl true
def handle_event("submit", %{"content" => _content}, socket) do
  {:noreply, socket}
end
We need to update our view to call the above submit event when the form is submitted. This is accomplished by placing a phx-submit attribute
on the form. Our server expects the submit event to contain the user input under the content key, so we must also name the textarea “content.”
- <form class="border-t border-gray-200 p-4 space-y-2">
+ <form phx-submit="submit" class="border-t border-gray-200 p-4 space-y-2">
    <textarea
+     name="content"
      class="block resize-none w-full border-gray-200 rounded bg-white focus:ring-0 focus:border-gray-300 focus:shadow-sm"
      placeholder="Enter a message..."
      rows={4}
If we type “Hello world” in the textarea and click “Send,” the form will submit over LiveView’s websocket connection, which Phoenix will log.
[debug] HANDLE EVENT "submit" in MyAppWeb.ChatsLive.Index
  Parameters: %{"content" => "Hello world"}
[debug] Replied in 175µs
All is working, but we need to render the user’s message in the UI (and later the messages from OpenAI). In a production setting, we would store these messages in a database and use LiveView’s streams to avoid holding all this state in memory. In this tutorial, we’re not using a database, so we will hold everything in memory.
On mount, let’s add a messages key to our assigns which will initially be an empty list.
  def mount(_params, _session, socket) do
-   {:ok, socket}
+   {:ok, assign(socket, :messages, [])}
  end
When a user submits their message, we’ll add it to the list of messages. Rework the submit callback to create the new message and prepend it to the list of messages.
def handle_event("submit", %{"content" => content}, socket) do
  message = %{role: :user, content: content}
  updated_messages = [message | socket.assigns.messages]
  {:noreply, assign(socket, :messages, updated_messages)}
end
Notice that we prepend the message to the list of messages, making the list of messages in reverse chronological order. We don’t have to do it
this way, but a common UI trick for rendering chat-like UIs is to use flex-direction: column-reverse to keep the container scrolled to the bottom.
The messages are stored in reverse order, but our CSS will reverse it back to the correct order.
Add the (unstyled) messages to the markup.
  <ol class="grow flex flex-col-reverse overflow-y-auto">
+   <li :for={message <- @messages}><%= message.content %></li>
    <li class="h-full hidden only:flex items-center justify-center">
      No messages. Enter a message below to begin.
    </li>
  </ol>
Note: I chose to style the empty message state as a hidden list item and use css to display it when it’s the only child of its parent. An alternative is to check the messages list to see if it’s empty and respond accordingly. I chose the CSS approach because applications using LiveView streams will not have an in-memory messages list to check the length of. Using DOM nodes as the source of truth means it will work in all cases.
With that, we can submit and store the messages on the server (in-memory) and render them in the UI.
Streaming a reply
Now we have to forward the user’s message content to OpenAI for a response. We’ll use gpt-4 as the model with a temperature set to 1.
The first thing we’ll do is create a new assign called running which will be used to indicate the model is running and we are waiting for its response.
  def mount(_params, _session, socket) do
-   {:ok, assign(socket, :messages, [])}
+   socket =
+     socket
+     |> assign(:messages, [])
+     |> assign(:running, false)
+
+   {:ok, socket}
  end
We will use this assign to disable the submit button when the model is running. This can also be used for loading states or other behavior if needed.
  <button
+   disabled={@running}
    class="bg-gray-200 hover:bg-gray-300 transition px-3 py-1.5 rounded flex items-center justify-center disabled:opacity-50 disabled:pointer-events-none"
  >
    Send
  </button>
Now we need to send a request to OpenAI when the user submits a message. We already implemented the handle_event/3 callback for this case but we
did not make a request to OpenAI. Update our handle_event callback to the below code.
def handle_event("submit", %{"content" => content}, socket) do
  message = %{role: :user, content: content}
  updated_messages = [message | socket.assigns.messages]

  # The process id of the current LiveView
  pid = self()

  socket =
    socket
    |> assign(:running, true)
    |> assign(:messages, updated_messages)
    |> start_async(:chat_completion, fn ->
      run_chat_completion(pid, Enum.reverse(updated_messages))
    end)

  {:noreply, socket}
end
There are two changes here from the previous implementation:
- We set the
runningassign totrue. - We perform the chat completion request to OpenAI asynchronously using LiveView’s
start_async/3. Running asynchronously avoids blocking the LiveView process which means it remains responsive to incoming messages or other state changes, which is necessary for streaming the response. Here we also remember to reverse the messages back to chronological order since we have been storing them reversed.
run_chat_completion/2 is implemented as follows:
defp run_chat_completion(pid, messages) do
  request = %{model: "gpt-4", temperature: 1, messages: messages}

  MyApp.Openai.chat_completion(request, fn chunk ->
    case chunk do
      %{"choices" => [%{"delta" => %{"content" => content}}]} ->
        send(pid, {:chunk, content})

      _ ->
        nil
    end
  end)
end
This is all pretty straightforward, the main thing to call out being that we send each chunk of text from the OpenAI stream back to the LiveView
process using its pid (process id).
The LiveView process then implements the handle_info/2 callback, which will be responsible for receiving streaming chunks from OpenAI
and forwarding them to the client.
@impl true
def handle_info({:chunk, chunk}, socket) do
  updated_messages =
    case socket.assigns.messages do
      [%{role: :assistant, content: content} | messages] ->
        [%{role: :assistant, content: content <> chunk} | messages]

      messages ->
        [%{role: :assistant, content: chunk} | messages]
    end

  {:noreply, assign(socket, :messages, updated_messages)}
end
When invoked with a chunk, handle_info/2 has two cases to handle:
- If this is the first chunk in a reply (which we determine by whether or not the most recent message is an
assistantmessage), the callback must create a newassistantmessage with that chunk. - For all subsequent chunks, the callback must append the chunk to the existing
assistantmessage content.
Finally, when the chat completion request finishes, the handle_async/3 callback will be invoked. This is called because we used start_async/3.
start_async/3 calls handle_async/3 when it completes with the result of the operation. Here we do not need the result as we already streamed
it back to the LiveView, so the only thing we’ll want to do inside this callback is set the running assign back to false.
@impl true
def handle_async(:chat_completion, _result, socket) do
  {:noreply, assign(socket, :running, false)}
end
And with that, our LiveView will stream OpenAI responses back to the client for a speedy and responsive user experience! The entire LiveView code is listed below.
defmodule MyAppWeb.ChatsLive.Index do
  use MyAppWeb, :live_view

  @impl true
  def mount(_params, _session, socket) do
    socket =
      socket
      |> assign(:messages, [])
      |> assign(:running, false)

    {:ok, socket}
  end

  @impl true
  def handle_event("submit", %{"content" => content}, socket) do
    message = %{role: :user, content: content}
    updated_messages = [message | socket.assigns.messages]

    # The process id of the current LiveView
    pid = self()

    socket =
      socket
      |> assign(:running, true)
      |> assign(:messages, updated_messages)
      |> start_async(:chat_completion, fn ->
        run_chat_completion(pid, Enum.reverse(updated_messages))
      end)

    {:noreply, socket}
  end

  @impl true
  def handle_async(:chat_completion, _result, socket) do
    {:noreply, assign(socket, :running, false)}
  end

  @impl true
  def handle_info({:chunk, chunk}, socket) do
    updated_messages =
      case socket.assigns.messages do
        [%{role: :assistant, content: content} | messages] ->
          [%{role: :assistant, content: content <> chunk} | messages]

        messages ->
          [%{role: :assistant, content: chunk} | messages]
      end

    {:noreply, assign(socket, :messages, updated_messages)}
  end

  defp run_chat_completion(pid, messages) do
    request = %{model: "gpt-4", temperature: 1, messages: messages}

    MyApp.Openai.chat_completion(request, fn chunk ->
      case chunk do
        %{"choices" => [%{"delta" => %{"content" => content}}]} ->
          send(pid, {:chunk, content})

        _ ->
          nil
      end
    end)
  end
end
Final touches
Before wrapping up, we should improve the UX a bit. The existing messages list is unstyled and it would be nice to support some keyboard shortcuts.
Styles
Of course, you can style this however you want. Here we’ll just add a few basic styles so we can differentiate messages from surrounding ones as well as preserve whitespace.
Change the markup that renders the list of messages to the below code.
<ol class="grow flex flex-col-reverse overflow-y-auto">
  <li
    :for={message <- @messages}
    class="p-4 flex items-start space-x-4 border-b first:border-b-0 hover:bg-gray-200 transition-colors"
  >
    <div class="shrink-0 pt-0.5 opacity-75">
      <svg
        :if={message.role == :assistant}
        width="24"
        height="24"
        viewBox="0 0 24 24"
        xmlns="http://www.w3.org/2000/svg"
      >
        <path
          d="M22.282 9.821a5.985 5.985 0 0 0-.516-4.91 6.046 6.046 0 0 0-6.51-2.9A6.065 6.065 0 0 0 4.981 4.18a5.985 5.985 0 0 0-3.998 2.9 6.046 6.046 0 0 0 .743 7.097 5.98 5.98 0 0 0 .51 4.911 6.051 6.051 0 0 0 6.515 2.9A5.985 5.985 0 0 0 13.26 24a6.056 6.056 0 0 0 5.772-4.206 5.99 5.99 0 0 0 3.997-2.9 6.056 6.056 0 0 0-.747-7.073zM13.26 22.43a4.476 4.476 0 0 1-2.876-1.04l.141-.081 4.779-2.758a.795.795 0 0 0 .392-.681v-6.737l2.02 1.168a.071.071 0 0 1 .038.052v5.583a4.504 4.504 0 0 1-4.494 4.494zM3.6 18.304a4.47 4.47 0 0 1-.535-3.014l.142.085 4.783 2.759a.771.771 0 0 0 .78 0l5.843-3.369v2.332a.08.08 0 0 1-.033.062L9.74 19.95a4.5 4.5 0 0 1-6.14-1.646zM2.34 7.896a4.485 4.485 0 0 1 2.366-1.973V11.6a.766.766 0 0 0 .388.676l5.815 3.355-2.02 1.168a.076.076 0 0 1-.071 0l-4.83-2.786A4.504 4.504 0 0 1 2.34 7.872zm16.597 3.855l-5.833-3.387L15.119 7.2a.076.076 0 0 1 .071 0l4.83 2.791a4.494 4.494 0 0 1-.676 8.105v-5.678a.79.79 0 0 0-.407-.667zm2.01-3.023l-.141-.085-4.774-2.782a.776.776 0 0 0-.785 0L9.409 9.23V6.897a.066.066 0 0 1 .028-.061l4.83-2.787a4.5 4.5 0 0 1 6.68 4.66zm-12.64 4.135l-2.02-1.164a.08.08 0 0 1-.038-.057V6.075a4.5 4.5 0 0 1 7.375-3.453l-.142.08L8.704 5.46a.795.795 0 0 0-.393.681zm1.097-2.365l2.602-1.5 2.607 1.5v2.999l-2.597 1.5-2.607-1.5z"
          fill="currentColor"
        />
      </svg>
      <svg
        :if={message.role == :user}
        width="24"
        height="24"
        viewBox="0 0 24 24"
        fill="none"
        stroke="currentColor"
        stroke-width="2"
        stroke-linecap="round"
        stroke-linejoin="round"
        xmlns="http://www.w3.org/2000/svg"
      >
        <path d="M7.9 20A9 9 0 1 0 4 16.1L2 22Z" />
      </svg>
    </div>
    <div class="leading-7 whitespace-pre-wrap"><%= message.content %></div>
  </li>
  <li class="h-full hidden only:flex items-center justify-center">
    No messages. Enter a message below to begin.
  </li>
</ol>
These changes will:
- Separate messages from each other by applying some padding and a border.
- Add SVG icons to differentiate user messages from assistant ones. SVGs were pulled from a google search for OpenAI and https://lucide.dev for the user one.
- Preserve whitespace. This helps readability as the models are trained to format their responses using newlines and markdown.
Keyboard shortcuts
A nice UX touch is to allow users to type a message and then press cmd+enter to submit, without needing to leave the textarea. This behavior is
often supported for many text inputs, particularly in chat-based UIs.
To support this behavior, we need to add a client-side JavaScript hook.
In assets/js/app.js, add the following code.
const SubmitOnCmdEnter = {
  mounted() {
    this.onKeydown = (e) => {
      if (e.key === "Enter" && e.metaKey) {
        this.el.form.dispatchEvent(
          new Event("submit", { bubbles: true, cancelable: true })
        );
      }
    };

    this.el.addEventListener("keydown", this.onKeydown);
  },

  destroyed() {
    this.el.removeEventListener("keydown", this.onKeydown);
  },
};
This hook can be attached to input, textarea, and other form elements. It binds a callback to the keydown event. If the user presses cmd+enter,
then this will dispatch a submit event to the form that encapsulates the element. We’ll use this to submit our form through our LiveView.
We need to register this hook with LiveView’s JS client before we can attach it to our textarea, which we do below in assets/js/app.js.
  let liveSocket = new LiveSocket("/live", Socket, {
+   hooks: {SubmitOnCmdEnter},
    longPollFallbackMs: 2500,
    params: {_csrf_token: csrfToken},
  });
Finally, we can attach this hook to our textarea using the phx-hook attribute. Hooks require the element have a unique id set, so we add that as well.
  <textarea
+   id="content"
+   phx-hook="SubmitOnCmdEnter"
    name="content"
    class="block resize-none w-full border-gray-200 rounded bg-white focus:ring-0 focus:border-gray-300 focus:shadow-sm"
    placeholder="Enter a message..."
    rows={4}
  ></textarea>
Users can now submit messages via cmd+enter keyboard shortcuts!
And with that, our fully-functional steaming UI is complete!
Conclusion
LiveView is a great option for building responsive, streaming user experiences. While you can accomplish this in most environments, this type of functionality is natural when using Phoenix thanks to the framework’s support for persistent connections over websockets, something that is provided out of the box for those using Phoenix.